Part 1 focuses on lo-fi approaches such as pen and paper-based techniques. Part 2 is concerned with more refined tools for producing polished UI mockups.
UI mockups, or wireframes, are a major part of any respectable functional specification. A functional specification is a description of how the software will work from the user’s point of view. This article doesn’t cover the reasons why you need a functional specification, for this I would suggest Joel Spolsky’s article Painless Functional Specifications. The focus of this piece is to describe and analyse a few approaches for creating UI mockups.
I’m sure there are many other approaches for creating wireframes, but I can only describe and comment on the ones I have used, making some general statements on what is good (or bad) about them.
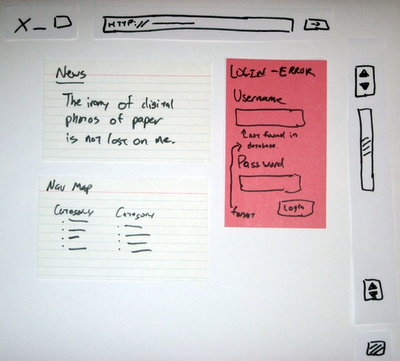
Lo-Fi Prototyping – this is just the fancy name for the old butcher’s paper approach. Hands down, its the best technique when a new shrink-wrapped software package is being designed. It really lends itself to collaborative effort, it gets the creative juices flowing, and the speed at which you can produce rough screens is unbeatable.

I once spent four days with a group of developers in a small apartment designing a telecommunications application using this technique. The result was just short of astounding, it allowed us to blast out and iterate ideas very quickly. As the UI designer for the team, I went home at the end of the week with a mass of paper which I turned into over 30 HTML mockups.
This approach is unsuitable for designing simple business websites or software which has been done before (e.g. non-novel systems like a shopping cart). It’s also not so great when a client is directly involved in the project. There are a few reasons for this; it requires a big investment of time on the client’s behalf (they may have a business to run during the day), and secondly; the client-to-supplier relationship often creates a dynamic where they tell you what they want, and you go off and make it. Normally, the client wont hang around whilst you design their software.
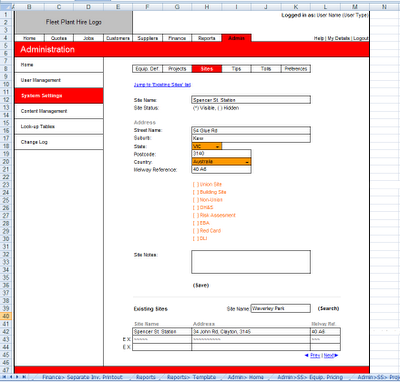
Microsoft Excel – yes, as strange as it may sound, MS Excel can be quite handy for producing wireframes, especially for software which is expected to have long vertically scrolling screens. I would never have thought to use it myself, but a company I worked for introduced me to it as their preferred spec’ing tool.

At first I was skeptical, but I quickly warmed to the approach when I saw how fast screens were to make once I got the hang of it. It’s excellent for inserting instructions to programmers (either in comments or as side-bar text). It does however produce exceedingly ugly wireframes; this is a good thing for application design since it keeps everyone’s focus on usability and business logic.
The other great thing about Excel is everyone is familiar with it, including clients. The closest thing I could think of as a criticism of Excel as a wireframe tool is that it produces decidedly uninspiring visuals. I currently don’t use Excel as a wireframe tool, but I would have no problem picking it up again if I felt it was right for a project.
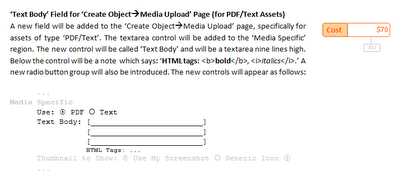
Microsoft Word - another desktop application you wouldn't normally think of as a wireframe tool, Word can be pretty good in certain situations. Generally, the only time I would use Word to represent UI controls is if I am making a ‘mini-spec’ for a web-based application.

A mini-spec is created in one of two situations; as an adjunct to an already ratified functional specification, or as a mechanism for grouping together a bunch of features for a version upgrade. UI controls are represented in a very rudimentary fashion, for instance; (*) would be a radio button, and [x] would be a checkbox, etc.
This works because the interface for the system has already been established (i.e. the system has been coded or a Photoshop mock-up exists). The advantage of this approach is speed; you describe the underlying functionality of the code and only mock-up the controls relevant to the feature rather then drawing the entire screen.
Continue on to part 2 of this article to find out how Visio and Photoshop can be used to produce highly refined mockups.

No comments:
Post a Comment
Note: Only a member of this blog may post a comment.